TL;DR
- ☁️ We'll learn how to deploy on Google Cloud Run
- ✨ We'll learn how to design and implement a modern workflow with GitHub Actions
- We'll see code snippets of real-world workflows
This article is also available on
Feel free to read it on your favorite platform✨
If you want to learn how to deploy like Vercel or Netlify with Google Cloud, this is the right place for you.
Vercel and Netlify both offer seamless transition from development to shipping your features and they make continuous delivery accessible out of the box. Today we'll be looking into how to design and re-create the live deployment and Deploy Preview with Cloud Run and GitHub Actions.
Let's go.
The Modern Workflow Design
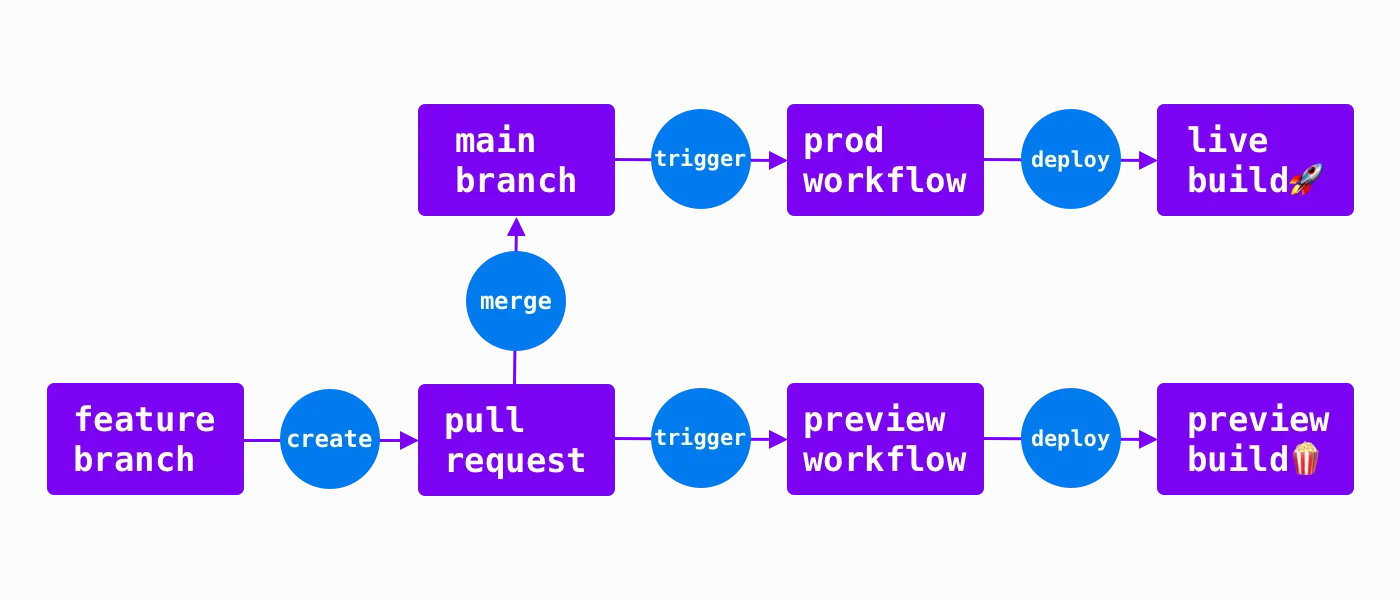
If you are familiar with Vercel or Netlify, you'll notice the trunk-based development principle by default. Your code changes directly go live when pushing your commits or merging a pull request to the main branch. Whenever you work on a pull request, both platforms create Deploy Previews so that you can collect feedback from your reviewers and stakeholders during development. This type of workflow enables us to collaborate early, mitigate errors, and ship fast.
To design the workflow, we can break it down to two paths:
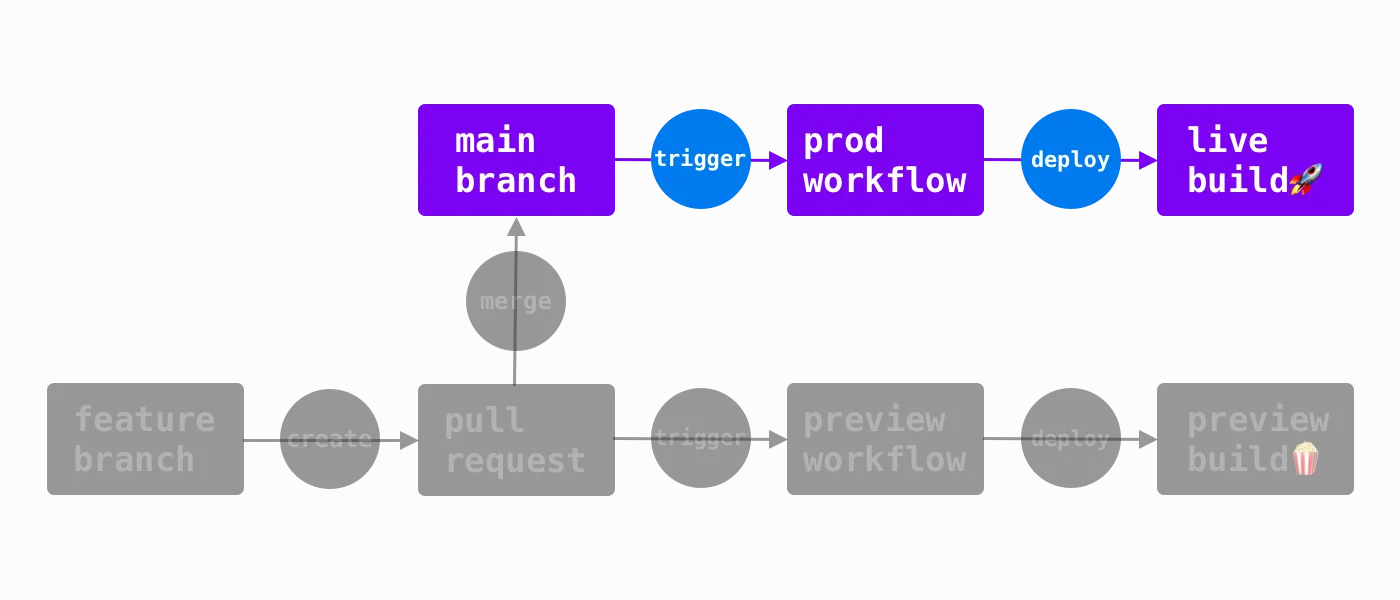
- Production workflow: triggered by push events in the main branch.
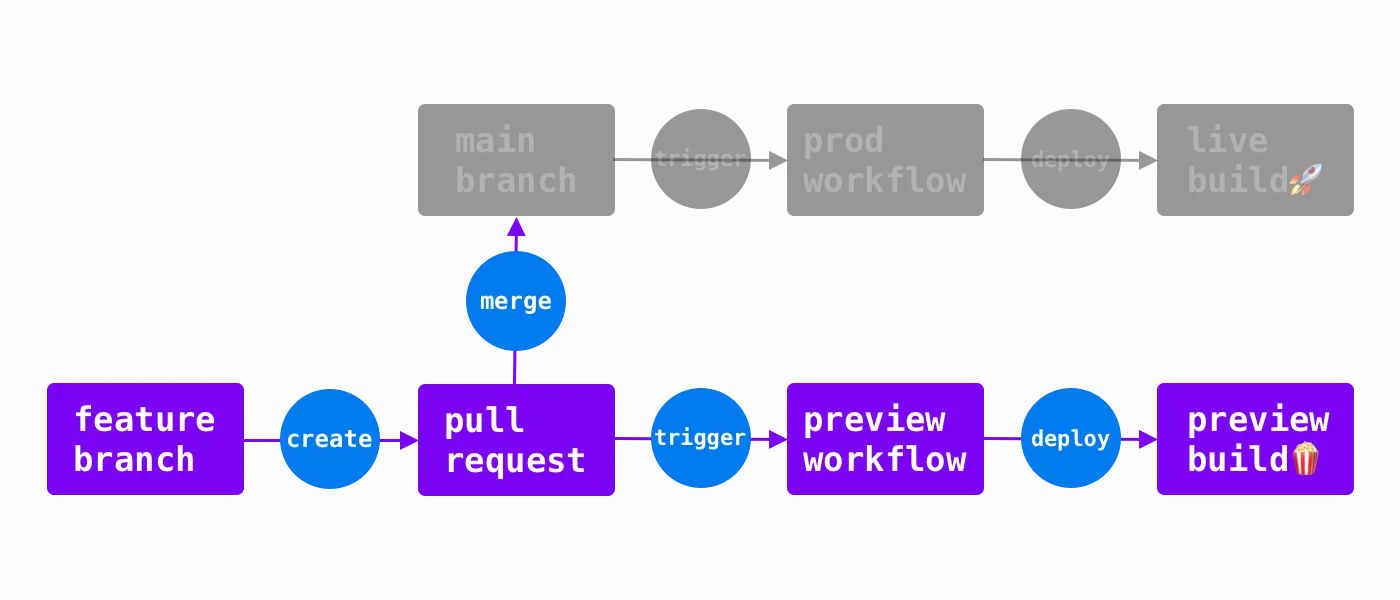
- Preview workflow: triggered by push and pull_request events in all branches except main.

Let's look into the prod workflow first.
Production Workflow

The production workflow does only one thing: live deployment. When a pull request merges into main, it triggers the workflow to deploy your production build to Cloud Run.
The workflow looks like this:
Set up Google Cloud
- Authenticate to Google Cloud
- Setup Google Cloud SDK
- Authorize to push docker containers to Artifact Registry
Push Docker Image to Artifact Registry
- Generate image tag
- Build docker container
- push docker container to registry
Deploy
- Deploy to Cloud Run
Set up Google Cloud
If you don't have a project on Google Cloud yet, follow this guide to create one. I'll name my project awesome-project.
To authenticate the workflow to access Google Cloud, we can use the auth GitHub Action to create an access token:
env:
  PROJECT_ID: 'awesome-project'
  SERVICE: 'homepage'
  REGION: 'us-west1' # ☘️Low CO2
  REGISTRY: '[YOUR_REGISTRY_ID]'
  IMAGE_NAME: 'live'
  WORKLOAD_IDENTITY_PROVIDER: '[YOUR_WORKLOAD_PROVIDER_ID]'
  SERVICE_ACCOUNT: '[YOUR_SERVICE_ACCOUNT_ID]'

jobs:
  deploy:
    runs-on: ubuntu-20.04

    steps:
      - name: Checkout
        uses: actions/checkout@v3

      - name: 'Authenticate to Google Cloud'
        uses: 'google-github-actions/auth@v0.4.0'
        id: 'auth'
        with:
          token_format: 'access_token'
          workload_identity_provider: ${{ env.WORKLOAD_IDENTITY_PROVIDER }}
          service_account: ${{ env.SERVICE_ACCOUNT }}
Here we are authenticating via Workload Identity Federation. To make it work, we'll need
- a service account
- a workload identity provider
- to grand IAM roles to the Workload Identity Provider.
Congratulations, you've done it! It's the most difficult part of the workflow.
Now we can set up Cloud SDK and authorize the workflow to be able to push Docker containers to Artifact Registry:
steps:
  - name: Set up Cloud SDK
    uses: google-github-actions/setup-gcloud@v0

  - name: Authorize Docker push
    run: gcloud auth configure-docker ${{ env.REGISTRY }}
You can follow this guide to set up Artifact Registry for storing Docker containers.
Push Docker Image to Artifact Registry
We are now able to push containers so let's dockerize your project and tag your image:
steps:
  - name: Generate Image Tag
    id: image-tag
    run: |
      image_tag="$REGISTRY/$PROJECT_ID/$SERVICE/$IMAGE_NAME:${GITHUB_SHA::8}"
      echo "tag=$image_tag" >> $GITHUB_OUTPUT

  - name: Build Docker Container
    run: |
      docker build -t ${{ steps.image-tag.outputs.tag }}

  - name: Push Docker Container
    run: |
      docker push ${{ steps.image-tag.outputs.tag }}
Deploy
Now you are ready to deploy to cloud run using the docker container:
steps:
  - name: Deploy to Cloud Run
    run: |
      gcloud run deploy ${{ env.SERVICE }} \
        --platform "managed"
        --region ${{ env.REGION }} \
        --image ${{ steps.image-tag.outputs.tag }}
Cloud Run will assign 100% of the traffic to this deployment by default so all visitors will be directed to this revision.
In the Cloud Console, you'll find a URL to your Cloud Run deployment. It looks like this: https://homepage-12345abcde-ez.a.run.app. We'll need it later for our preview workflow.
The Complete Production Workflow
name: Production Workflow

on:
  push:
    branches:
      - main

env:
  PROJECT_ID: 'awesome-project'
  SERVICE: 'homepage'
  REGION: 'us-west1' # ☘️Low CO2
  REGISTRY: '[YOUR_REGISTRY_ID]'
  IMAGE_NAME: 'live'
  WORKLOAD_IDENTITY_PROVIDER: '[YOUR_WORKLOAD_PROVIDER_ID]'
  SERVICE_ACCOUNT: '[YOUR_SERVICE_ACCOUNT_ID]'

jobs:
  deploy:
    runs-on: ubuntu-20.04

    steps:
      - name: Checkout
        uses: actions/checkout@v3

      - name: 'Authenticate to Google Cloud'
        uses: 'google-github-actions/auth@v0.4.0'
        id: 'auth'
        with:
          token_format: 'access_token'
          workload_identity_provider: ${{ env.WORKLOAD_IDENTITY_PROVIDER }}
          service_account: ${{ env.SERVICE_ACCOUNT }}

      - name: Set up Cloud SDK
        uses: google-github-actions/setup-gcloud@v0

      - name: Authorize Docker push
        run: gcloud auth configure-docker ${{ env.REGISTRY }}

      - name: Generate Image Tag
        id: image-tag
        run: |
          image_tag="$REGISTRY/$PROJECT_ID/$SERVICE/$IMAGE_NAME:${GITHUB_SHA::8}"
          echo "tag=$image_tag" >> $GITHUB_OUTPUT

      - name: Build Docker Container
        run: |
          docker build -t ${{ steps.image-tag.outputs.tag }}

      - name: Push Docker Container
        run: |
          docker push ${{ steps.image-tag.outputs.tag }}

      - name: Deploy to Cloud Run
        run: |
          gcloud run deploy ${{ env.SERVICE }} \
            --platform "managed"
            --region ${{ env.REGION }} \
            --image ${{ steps.image-tag.outputs.tag }}
Preview Workflow

The preview workflow is similar to production with a few modifications:
Set up Google Cloud
- Authenticate to Google Cloud
- Setup Google Cloud SDK
- Authorize to push docker containers to Artifact Registry
Push Docker Image to Artifact Registry
- Get Task Id from Reference
- Generate image tag
- Build docker container
- push docker container to registry
Deploy
- Deploy revision with tag
- Comment preview URL in the pull request
Let's take a look at the differences.
Push Docker Image to Artifact Registry
The first difference is tagging the Docker image. In the production workflow, we use a constant $IMAGE_NAME in environment variables to tag the production image. However, for previews, we want to use an identifier that represents the pull request. We are using the first 8 characters of the branch name as the identifier:
steps:
  - name: Get Task Id from Reference
  id: task
  run: |
    name="${{ github.ref_name }}"
    lowercase="${name,,}"
    echo "id=${lowercase:0:8}" >> $GITHUB_OUTPUT
As an example I'll name the branch TASK-123-awesome-workflow. The task step will extract the task ID task-123 from the branch name.
If you are curious about the shell script syntax, check out Shell Parameter Expansion.
The identifier is set to be in lowercase because we'll use it for tagging the Cloud Run revision later. The naming convention of Cloud Run tags is as follows:
- it allows lowercase characters
- it allows numbers
- it allows "-"
- it has a maximum length limit of 63 characters
Next we can use the task id to tag the image, build a container, and push to the registry:
steps:
  - name: Generate Image Tag
    id: image-tag
    run: |
      image_tag="$REGISTRY/$PROJECT_ID/$SERVICE/${{ steps.task.outputs.id }}:${GITHUB_SHA::8}"
      echo "tag=$image_tag" >> $GITHUB_OUTPUT

  - name: Build Docker Container
    run: |
      docker build -t ${{ steps.image-tag.outputs.tag }}

  - name: Push Docker Container
    run: |
      docker push ${{ steps.image-tag.outputs.tag }}
Deploy
Now we are ready to deploy the preview. The deployment is similar to live deployment with two differences:
- Unlike live deployment, we want to assign 0% of the traffic to the preview revision.
- We want to give the deployment a different URL other than the live URL.
We can use --tag and --no-traffic parameters to achieve them:
steps:
  - name: Deploy Revision with Tag
      run: |
        gcloud run deploy ${{ env.SERVICE }} \
          --platform "managed" \
          --region ${{ env.REGION }} \
          --image ${{ steps.image-tag.outputs.tag }} \
          --tag pr-${{ steps.task.outputs.id }} \
          --no-traffic
After running the step successfully, you'll get the preview URL like this: https://pr-task-123---homepage-12345abcde-ez.a.run.app.
Finally, we can post a comment about the preview URL on the pull request:
steps:
  - name: Comment Preview URL in PR
    uses: mshick/add-pr-comment@v2
    env:
      GITHUB_TOKEN: ${{ secrets.GITHUB_TOKEN }}
    with:
      message: |
        🍿 Successfully deployed preview revision at https://pr-${{ steps.jira.outputs.id }}---homepage-12345abcde-ez.a.run.app
      allow-repeats: false
The Complete Preview Workflow
name: Preview Workflow

on:
  push:
    branches-ignore:
      - main
  pull_request:
    branches-ignore:
      - main
  workflow_run:
    workflows: ['Dev CI']
    types: [completed]

env:
  PROJECT_ID: 'awesome-project'
  SERVICE: 'homepage'
  REGION: 'us-west1'
  REGISTRY: '[YOUR_REGISTRY_ID]'
  WORKLOAD_IDENTITY_PROVIDER: '[YOUR_WORKLOAD_PROVIDER_ID]'
  SERVICE_ACCOUNT: '[YOUR_SERVICE_ACCOUNT_ID]'

jobs:
  preview:
    runs-on: ubuntu-20.04

    permissions:
      pull-requests: 'write'

    steps:
      - name: Checkout
        uses: actions/checkout@v3

      - name: 'Authenticate to Google Cloud'
        uses: 'google-github-actions/auth@v0.4.0'
        id: 'auth'
        with:
          token_format: 'access_token'
          workload_identity_provider: ${{ env.WORKLOAD_IDENTITY_PROVIDER }}
          service_account: ${{ env.SERVICE_ACCOUNT }}

      - name: Set up Cloud SDK
        uses: google-github-actions/setup-gcloud@v0

      - name: Authorize Docker push
        run: gcloud auth configure-docker ${{ env.REGISTRY }}

      # Get task id in lowercase from branch name for docker image naming convention
      # More detail on base parameter expansion: https://www.gnu.org/software/bash/manual/html_node/Shell-Parameter-Expansion.html
      - name: Get Task Id from Reference
        id: task
        run: |
          name="${{ github.ref_name }}"
          lowercase="${name,,}"
          echo "id=${lowercase:0:8}" >> $GITHUB_OUTPUT

      - name: Generate Image Tag
        id: image-tag
        run: |
          image_tag="$REGISTRY/$PROJECT_ID/$SERVICE/${{ steps.task.outputs.id }}:${GITHUB_SHA::8}"
          echo "tag=$image_tag" >> $GITHUB_OUTPUT

      - name: Build Docker Container
        run: |
          docker build -t ${{ steps.image-tag.outputs.tag }}

      - name: Push Docker Container
        run: |
          docker push ${{ steps.image-tag.outputs.tag }}

      - name: Deploy Revision with Tag
        run: |
          gcloud run deploy ${{ env.SERVICE }} \
            --platform "managed" \
            --region ${{ env.REGION }} \
            --image ${{ steps.image-tag.outputs.tag }} \
            --tag pr-${{ steps.jira.outputs.id }} \
            --no-traffic

      - name: Comment Preview URL in PR
        uses: mshick/add-pr-comment@v2
        env:
          GITHUB_TOKEN: ${{ secrets.GITHUB_TOKEN }}
        with:
          message: |
            🍿 Successfully deployed preview revision at https://pr-${{ steps.jira.outputs.id }}---homepage-12345abcde-ez.a.run.app
          allow-repeats: false
Final Thoughts
We've just re-created the modern workflow from Vercel and Netlify! There are a few improvements to make the workflow more robust:
- use a short hash as the identifier to tag preview image and Cloud Run revision
- replace the hard coded live URL with a step output in the preview comment step
- add a workflow that cleans up the unused Cloud Run revisions and Docker containers
References
- GitHub: auth GitHub Action
- Article: Enabling keyless authentication from GitHub Actions - Google Cloud
- Website: Vercel Previews
- Website: Netlify Deploy Previews
- Website: Vercel
- Website: Netlify
- Document: Shell Parameter Expansion - GNU
- Google Cloud
- Article: Ex-Principal Engineer's Guide to Design Thinking and Continuous Delivery - Daw-Chih Liou
- Document: Cloud Run - Google Cloud
- Website: GitHub Actions
- Document: DevOps tech: Trunk-based development - Google Cloud
- Website: Artifact Registry - Google Cloud
- Website: Cloud SDK - Google Cloud
- Document: Workload identity federation - Google Cloud
- Document: Create and manage service account keys- Google Cloud
- Document: Configure workforce identity federation - Google Cloud
- Document: Store Docker container images in Artifact Registry - Google Cloud
- Document: Creating and managing projects - Google Cloud
- Document: Use tags for testing, traffic migration and rollbacks - Google Cloud
- GitHub: add-pr-comment
- Github: setup-gcloud GitHub Action
Here you have it! Thanks for reading through🙌 If you find this article useful, please share it to help more people in their engineering journey.
🐦 Feel free to connect with me on twitter!
⏭ Ready for the next article? 👉 Easiest Way to Understand Rust Modules Across Multiple Files
Happy coding!

