

TL;DR
- 💡 Easy and simple explanation of Rust's modules across different files.
- We'll deep dive into a real-world example to explore the module system.
- 📈 Tons of diagrams to help you understand.
This article is also available on
Feel free to read it on your favorite platform✨
The module system in Rust can be confusing for developers coming from other languages. It took me a while to understand it so I want to share with you how it works and how to organize your program across multiple files with ease.
Let's go.
Rust Modules Across Files
Rust requires the developers to manually build module trees. The way to do it is by declaring modules with the mod keyword.
The module tree starts with the crate root, usually src/lib.rs for a library crate or src/main.rs for a binary crate. The Rust compiler will first look in the crate root for modules to compile.
Let's say you want to import a module "a" in a binary crate, you can declare the module like this:
mod a;

fn main() { /* do amazing things */ }
The compiler will look for the module in the src directory in the following places:
In src/a.rs
.
├── Cargo.lock
├── Cargo.toml
└── src
    ├── a.rs
    └── main.rs
Or in src/a/mod.rs
.
├── Cargo.lock
├── Cargo.toml
└── src
    ├── a
    │   └── mod.rs
    └── main.rs
By declaring mod a in main.rs, you've built a module tree like this:

Rust Submodules Across Files
Within a module, you can create submodules to further organize your code. Let's say you want to declare module "b" and "c" in module "a":
mod b;
mod c;
The compiler will look for the submodules in src/a directory:
.
├── Cargo.lock
├── Cargo.toml
└── src
    ├── a
    │   ├── b.rs
    │   ├── c.rs
    │   └── mod.rs
    └── main.rs
Now you've build a tree like this:

Visibility with "pub"
By default, all the items in a module are private. They are only visible by the items in the same module.
mod b;
mod c;

fn do_a() {} // only the other functions in module a can use it
             // it's not visible to main.rs
In order for its parent modules to have access to the function do_a, we need to add the key word pub.
pub fn do_a() {} // now it's visible to main.rs
We can access do_a using the path qualifier ::.
mod a;

fn main() {
    a::do_a();
}
We can use the same pattern for submodules.
pub fn do_b() {} // visible to module "a" and all the submodules of module "a"
By adding pub to do_b, the function now is accessible to module "a".
mod b;
mod c;

pub fn do_a {
    b::do_b();
}
do_b is also accessible to the submodules of module "c". You can access it with either the absolute or relative path.
pub fn do_c {
    crate::a::b::do_b(); // absolute path
    super::b::do_b(); // relative path
}
Re-exporting Items
An item of a submodule is not accessible to a non-parent module. For example, we can try to access do_b in main.rs
mod:a;

fn main() {
    a::b::do_b();
    // ^^^^ function `do_b` is private
}
You'll see an error message saying do_b is private. That's because do_b is only accessible within module "a" so far. To make it visible to the crate root, We need to re-export it by adding pub to the module "b" declaration from module "a".
pub mod b;
// --snip--
The "use" Declaration
The use declaration can help you shorten the path when accessing an item in another module. For example, we can refactor the submodule "c":
use crate::a::b::do_b;

pub fn do_c {
    do_b();
}
It creates a local name binding to its path for do_b. use is very useful for long paths.
A Real World Example
To demonstrate the Rust's module system, I created a simple CLI called affme, short for "affirm me".
affme is an self-affirmation generator. The CLI takes in a name as a parameter and displays a randomized affirmation.
The demo is available on GitHub. Feel free to take a look at the repo and try it out✨
The code design is straightforward:
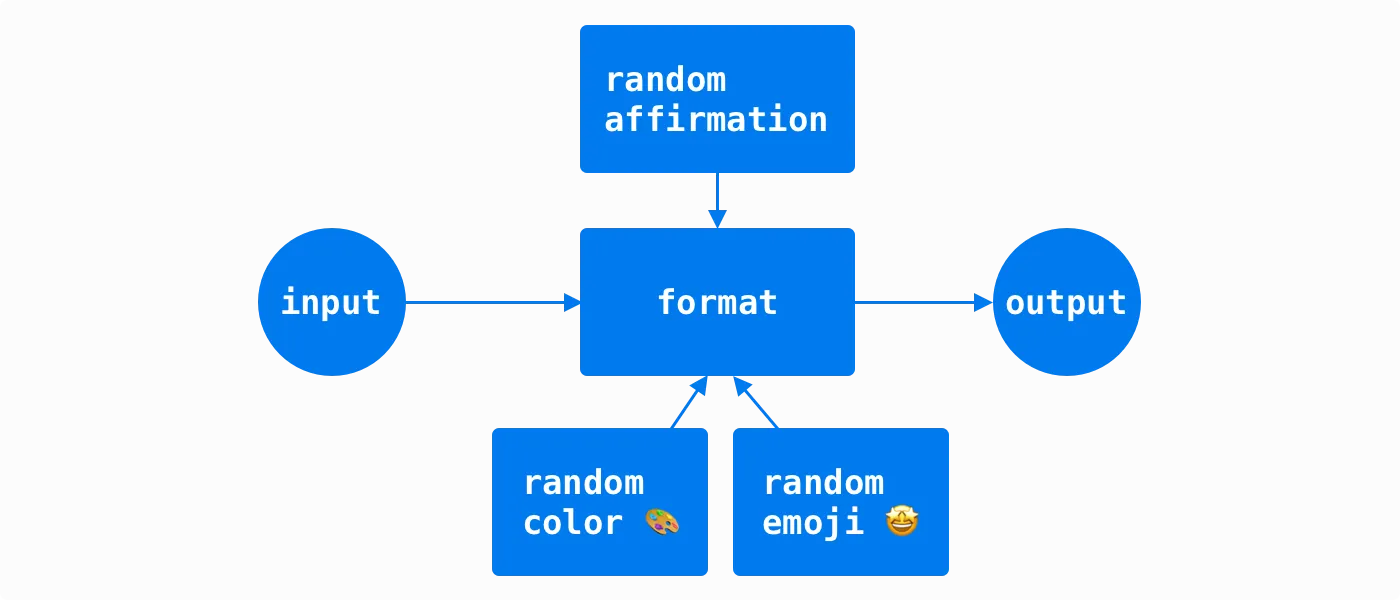
In the "format" block,
- It takes a user input,
- concatenates the input with a random affirmation and a random emoji,
- applies a random font color to the concatenated affirmation,
- and finally outputs the affirmation.
To showcase the module system across files, I design the module tree as following:
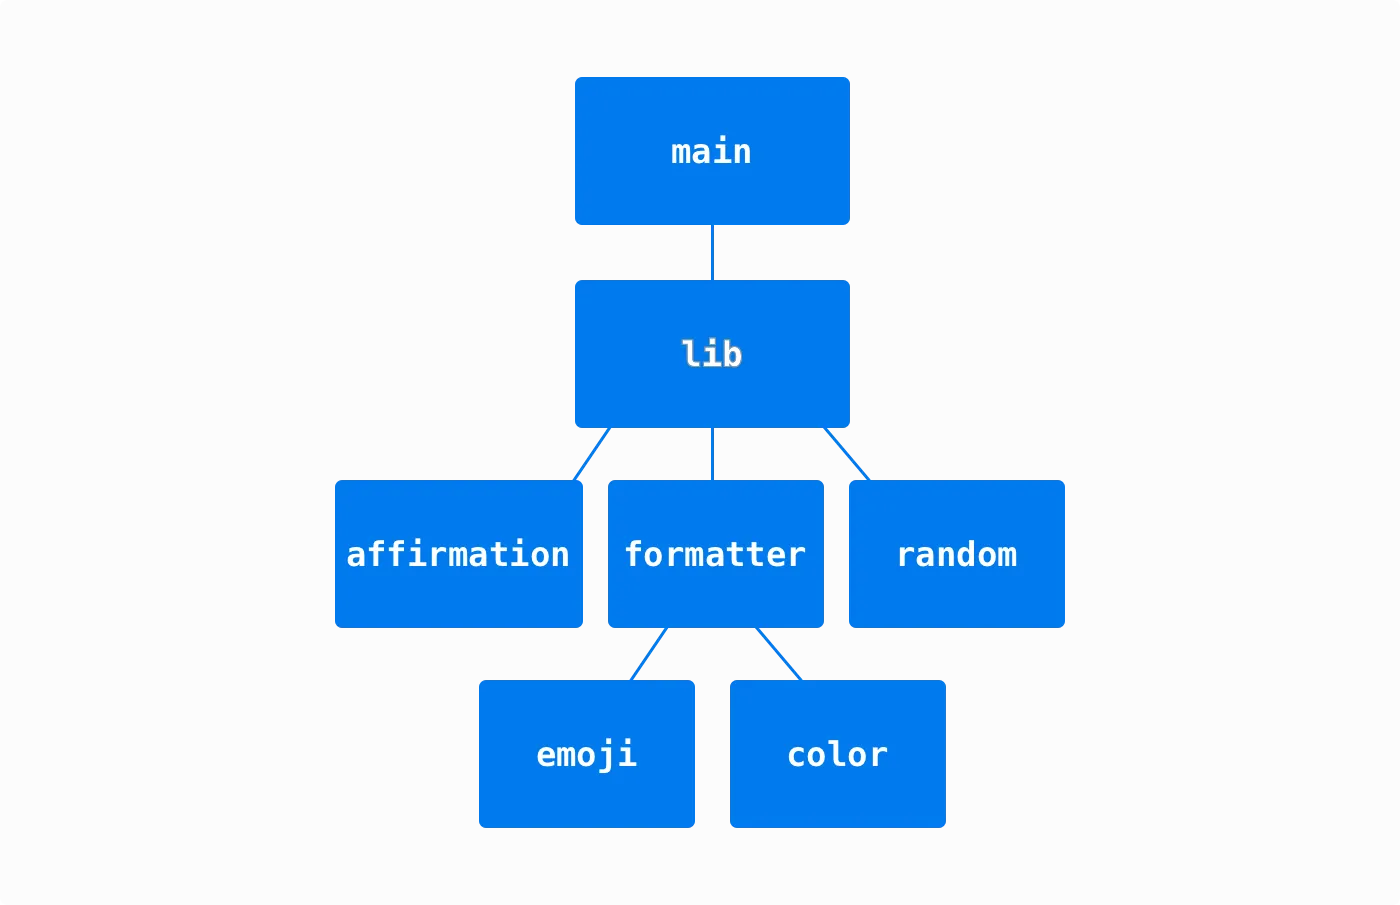
A few things worth mentioning:
- This package has two crates, one binary and one library. I use the library crate to encapsulate the implementation and the binary crate to execute the CLI.
- In the library crate root src/lib.rs, it accesses functions from the affirmation and formatter module.
- The affirmation module and both of the submodules in the formatter module are using the same function in the random module to randomly pick an item. Because the affirmation module and formatter submodules are in different branches of the tree, we need to declare the random module in the common ancestor of the module tree.
In the file system, it looks like this:
.
├── Cargo.lock
├── Cargo.toml
├── src
│   ├── affirmation.rs
│   ├── formatter
│   │   ├── color.rs
│   │   ├── emoji.rs
│   │   └── mod.rs
│   ├── lib.rs
│   ├── main.rs
│   └── random.rs
└── target
Let's dive into the library crate root to see how the code is structured.
mod affirmation;
mod formatter;
mod random;

use affirmation::Affirmation;
use formatter::format;

pub fn affirm(name: &str) -> String {
    let affirmation = Affirmation::new().random();
    format(affirmation, name)
}
Here you can see the module declarations on the top. You can also find the use declarations to create the local name binding for Affirmation and format.
The random module is straightforward:
use rand::Rng;

pub fn pick<'a, T: ?Sized>(items: &[&'a T]) -> &'a T {
    let random_index: usize = rand::thread_rng().gen_range(0..items.len());
    items.get(random_index).unwrap()
}
It has a public pick function that returns a random item from an array slice. I use the function to pick random affirmations, emojis, and colors. Let's take a look at affirmation module as an example:
use crate::random;

#[derive(Debug)]
pub struct Affirmation<'a> {
    affirmations: [&'a str; 6],
}

impl<'a> Affirmation<'a> {
    pub fn new() -> Self {
        let affirmations = [
            "You're beautiful",
            "You're awesome",
            "You're wonderful",
            "You've got this",
            "You can do all things",
            "Go get it",
        ];
        Affirmation { affirmations }
    }

    pub fn random(&self) -> &'a str {
        random::pick(&self.affirmations)
    }
}
You can see the use declaration for the random module. The affirmation module is able to access the random module because the random module was declared in the library crate root. I use the pub keyword on the Affirmation struct and its functions so that the crate root has visibility over them.
You can find the same coding pattern in the emoji and color submodule.
To bring it all together, let's take a look at the format module.
mod color;
mod emoji;

use color::Color;
use colored::*;
use emoji::Emoji;

pub fn format(affirmation: &str, name: &str) -> String {
    let emoji = Emoji::new();
    let color = Color::new();

    let phrase = format!("{}, {} {}", affirmation, name, emoji.random())
        .color(color.random())
        .bold()
        .to_string();

    format!(
        "{}\n{}\n{}\n{}\n{}",
        "*".repeat(phrase.len() + 2).magenta(),
        format!("*{}*", " ".repeat(phrase.len())).magenta(),
        format!("    ✏️  ...{}  ", phrase,),
        format!("*{}*", " ".repeat(phrase.len())).magenta(),
        "*".repeat(phrase.len() + 2).magenta()
    )
}
It brings color and emoji submodules in scope so we can concatenate the full affirmation with random emoji and random font color.
Final Thoughts
Rust Modules across multiple files is a little different from other languages but once you understand mod, use, and pub, the module design becomes easier and intentional.
Rust Module Cheat Sheet
- A module tree starts from the crate root.
- Use mod to build your tree with modules and submodules.
- Use pub to make module items visible to the parent module.
- You can re-export with pub mod or pub use.
Special Thanks
Thanks Liang Chun for reviewing the example code in affme.
References
- Book: Defining Modules to Control Scope and Privacy - The Rust Programming Language
- Book: Use declarations - The Rust Reference
- Book: Items - The Rust Reference
- Book: Modules - The Rust Reference
- Book: Paths - The Rust Reference
- Article: How to Use Rust Modules Across Different Files - Casey Falkowski
- GitHub: affme repository
- GitHub: Liang Chun's profile
Here you have it! Thanks for reading through🙌 If you find this article useful, please share it to help more people in their engineering journey.
🐦 Feel free to connect with me on twitter!
⏭ Ready for the next article? 👉 Ex-Principal Engineer's Guide to Design Thinking and Continuous Delivery
Happy coding!