

TL;DR
- 🚀 Concurrent rendering addresses the performance problem with rendering large UI updates while keeping the UI responsive.
- 🔬 We'll use 3D rendering in the browser to stress test React 18.
- ⚖️ We'll look at the typical approaches alongside concurrent rendering and discuss their pros and cons.
This article is also available on
Feel free to read it on your favorite platform✨
In this article, we are diving into a 3D visualization and discuss how to optimize its performance step by step with React 18's concurrent rendering. Here's the sneak peek.
Concurrent Rendering with useTransition
React 18 introduces the concurrent features. The core idea is to classify state updates into two categories:
- Urgent updates: they provide responsive feedback to user interactions, like typing and clicking.
- Transition updates: they provide non-urgent UI transitions, like displaying dataset.
The purpose is to create a snappier and more responsive experience for the users.
Before React 18, all updates are considered urgent and a simple click or typing can cause the screen to freeze when there's a larger rending. So in React 18, by deferring non-urgent updates to urgent updates, users are able to receive immediate feedback from their interaction while React is working on the non-urgent updates in the background and reflect the result when ready.
React Working Group published a couple great articles about transition updates:
According to the working group, the concurrent rendering is able to perform the following things:
- Yielding: React will periodically stop working and let the browser fire one or more side effects.
- Interrupting: When React detects new urgent updates, it will interrupt and pause non-urgent updates and start working on incoming urgent updates so the page can stay responsive.
- Skipping old results: React will discard outdated transition updates and only render with the newest state.
We'll use the format and methods from the articles to test the 3D rendering demo and observe the impact on the performance and user experience.
3D Rendering Demo Overview
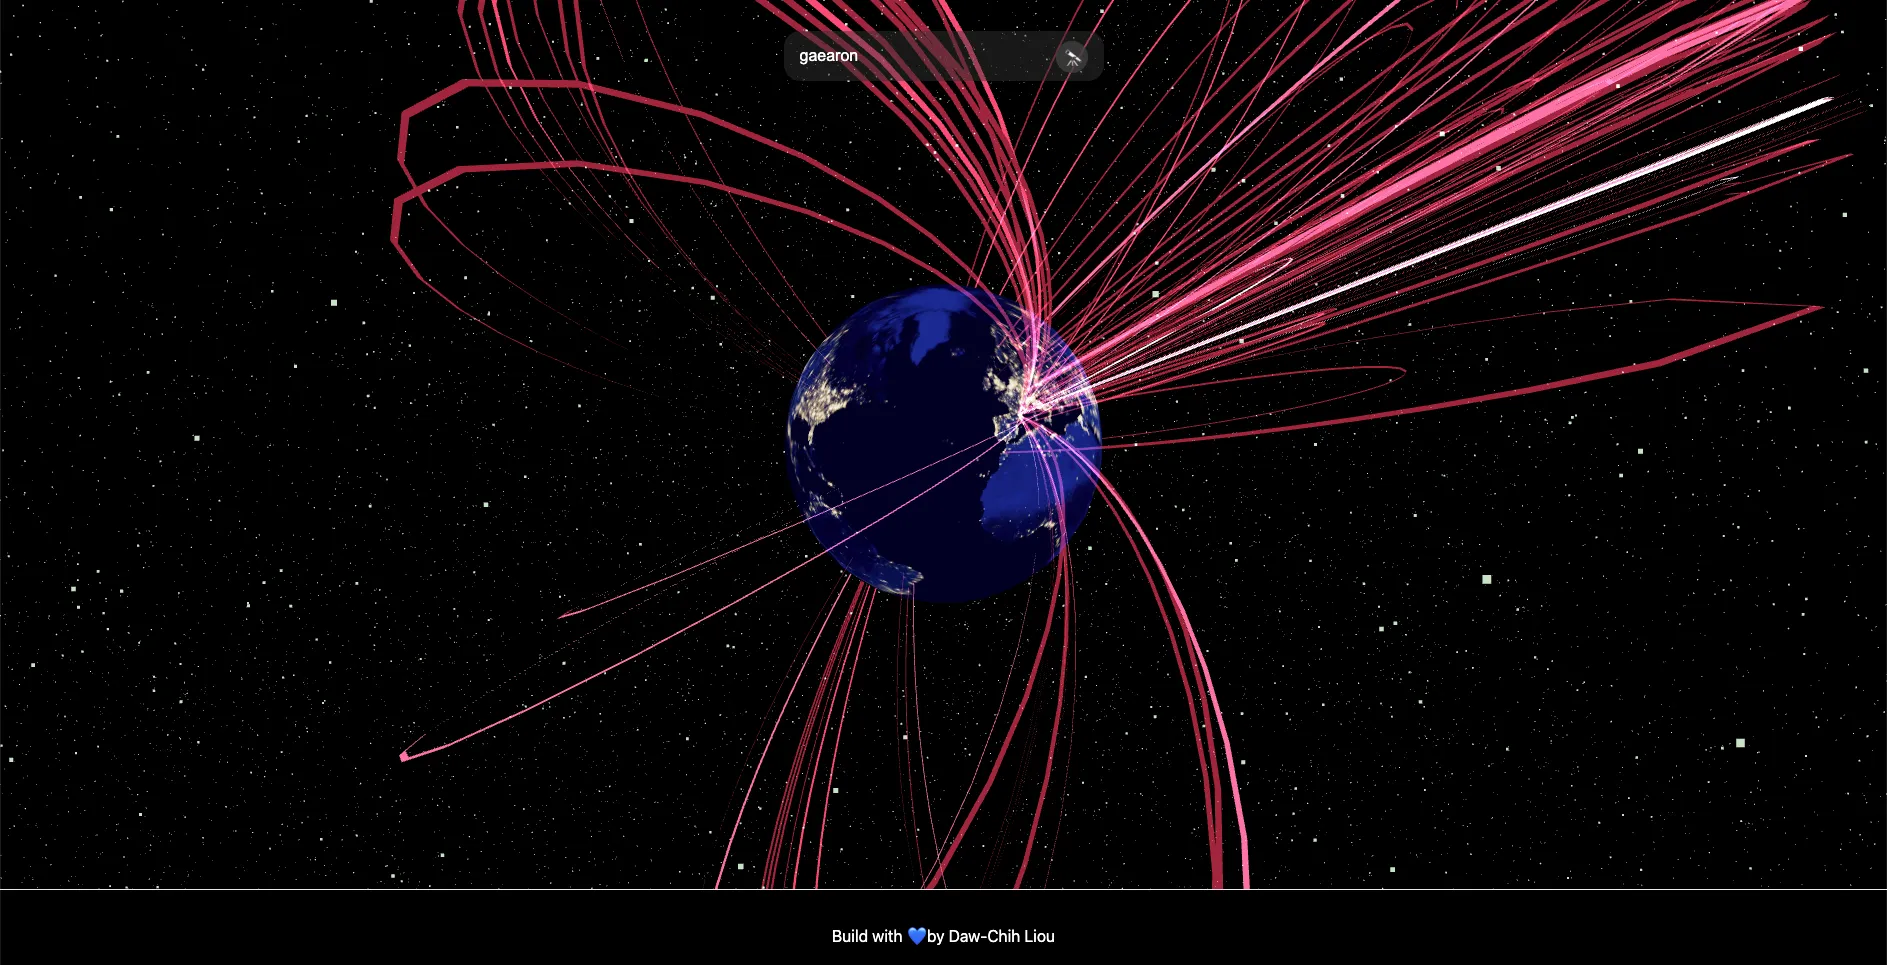
In order to create heavy computations for rendering, I built a 3D visualization to show the connections between a GitHub user and the users she's connected with on GitHub.
The technology includes:
The UI looks like this:
The components we will be discussing today includes:
- Search Bar: to search for a GitHub username and fetch the user info from the GitHub GraphQL API.
- Scene: to visualize the connections between the user and her connections in on a 3D globe.
You can find the repository on GitHub and the demo on Netlify.
Please note that the demo might crash due to a task timeout. The timeout is caused by the slow experimental API call to fetch the coordinates of the cities. If you'd like to interact with the demo, it's recommended to fork the repository and run the development server locally.
As we type into the search bar, you'll see an increasing amount of stars in the scene to simulate the high rendering demand on the UI. The amount of stars is 100,000 * inputValue.length. We'll use it to stress test concurrent rendering.
The Problem
Let's start with our base case with the most basic implementation. The outcome looks like this:
You can see my typing on the bottom left corner of the video.
As I was typing, the search bar was frozen. It didn't display the input value until the very end. Not just the search bar, the scene was frozen too. The stars didn't get rendered until I finished typing. Ideally, we want to be able to observe immediate feedback from our typing.
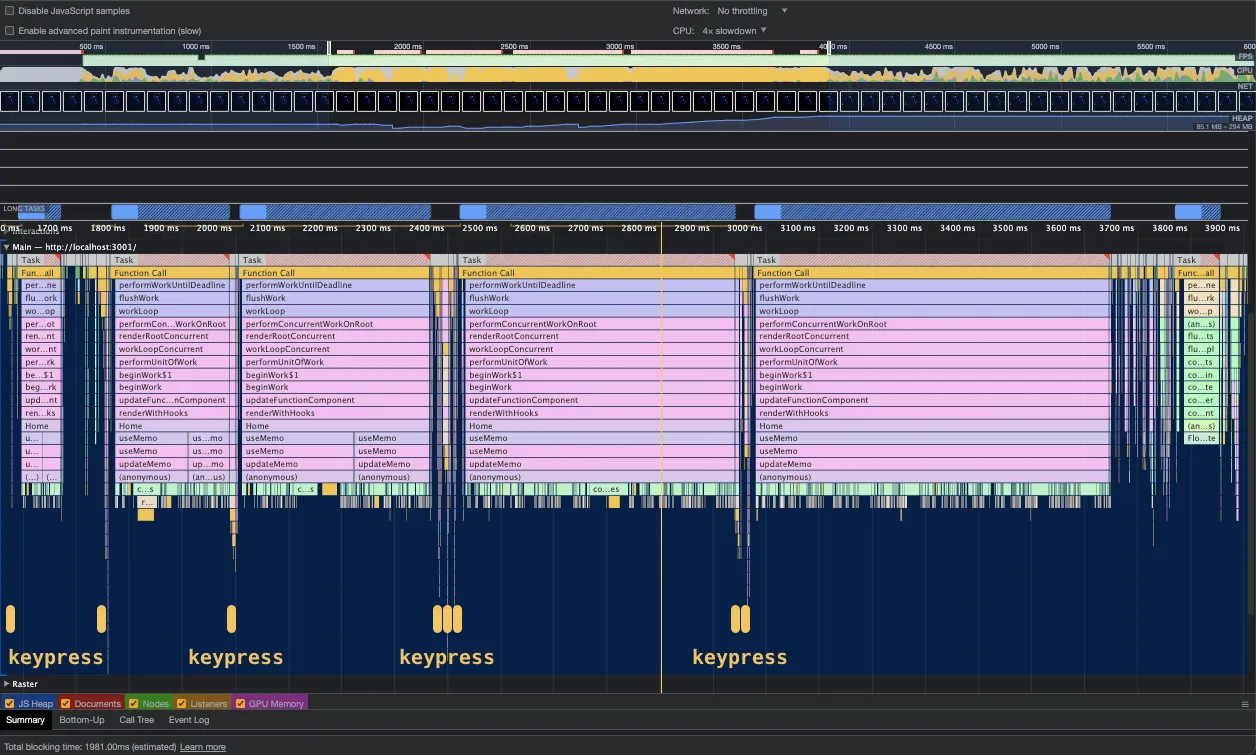
Let's look into the performance together. We'll slow down the CPU by 4x and run a performance profiling.
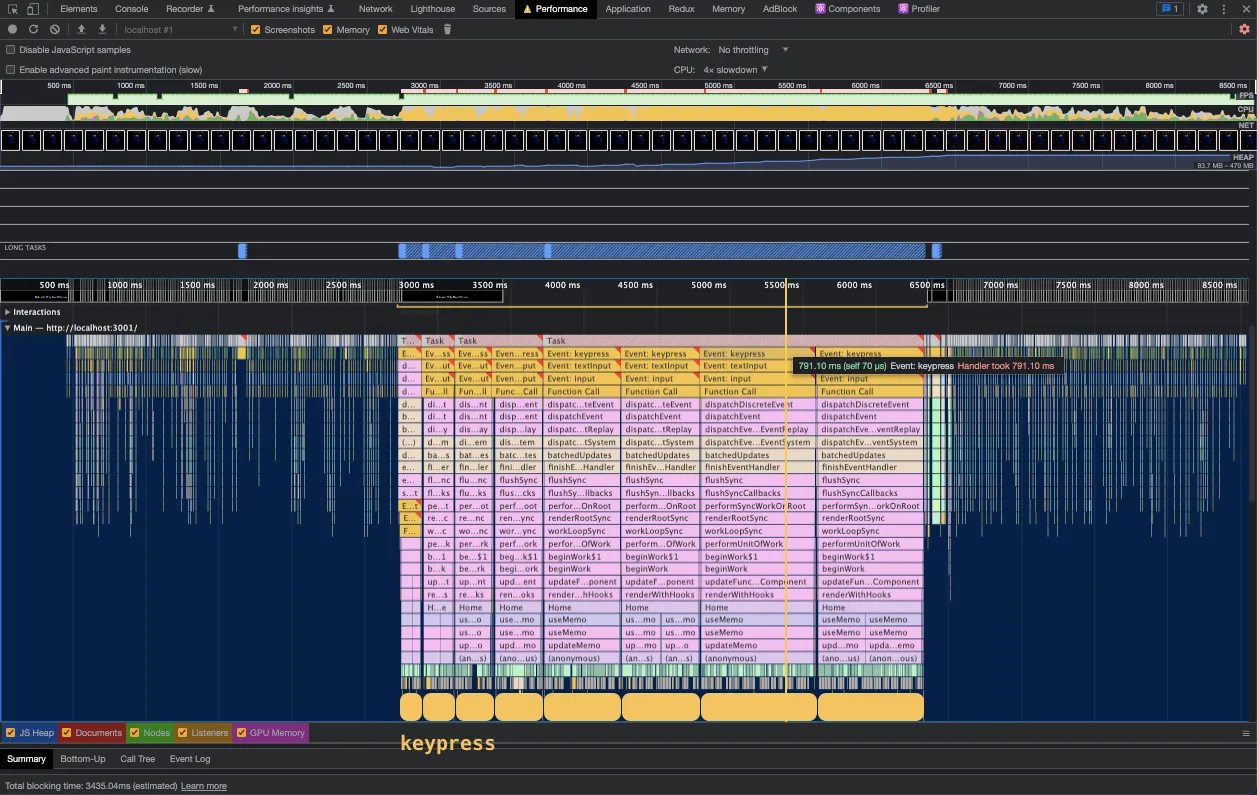
You can see the big chunks of tasks with keypress event in the flame chart. With each keypress, React computes the next rendering for the SearchBar and the Scene. As we see in the chart, the longest task takes almost 0.8 seconds to complete. That's why the page feels so slow.
So, what's happening?
In the Home page component, the SearchBar listens to the keypress event and update the username when changes happens.
const Home: NextPage = () => {
  const [username, setUsername] = useState<string>('')

  const vertices = useMemo(() => computeVertices(username.length), [username])

  const handleChange = (username: string) => {
    setUsername(username)
  }

  return (
    <>
      <SearchBar value={username} onChange={handleChange} />
      <Scene vertices={vertices} />
    </>
  )
}
Whenever there's a username update, React recomputes vertices by calling computeVertices() and pass the result in to the Scene component to render the stars. Since the number of vertices is 100,000 * username.length, coupling the two state updates together is a very expensive rendering cycle.
How did We Fix It Before React 18?
Ideally, we want to see what we typed in the search bar immediately. Knowing that updating both states in the same rendering cycle takes too long, we can simply split the two updates so that SearchBar and Scene gets rendered separately.
Let's first add a new state for the SearchBar:
type FastSearchBarProps = {
  defaultValue: string
  onChange: (value: string) => void
}

function FastSearchBar({ defaultValue, onChange }: FastSearchBarProps) {
  // new state designated to SearchBar
  const [value, setValue] = useState(defaultValue)

  const handleChange = (value: string) => {
    // update input value
    setValue(value)

    // update vertices
    onChange(value)
  }

  return <SearchBar value={value} onChange={handleChange} />
}

const Home: NextPage = () => {
  const [username, setUsername] = useState<string>('')

  const vertices = useMemo(() => computeVertices(username.length), [username])

  const handleChange = (username: string) => {
    setUsername(username)
  }

  return (
    <>
      <FastSearchBar defaultValue={username} onChange={handleChange} />
      <Scene vertices={vertices} />
    </>
  )
}
Now we have a value state for SearchBar and a username state for computing vertices. We'll need additional work to separate the renderings because React will batch the state updates together in the same event to avoid additional rendering. Let's take a look at some of the typical approaches.
Approach #1: setTimeout
We can simply defer the slower update by adding setTimeout to put the it in the event loop.
function FastSearchBar({ defaultValue, onChange }: FastSearchBarProps) {
  const [value, setValue] = useState(defaultValue)

  const handleChange = (value: string) => {
    setValue(value)

    setTimeout(() => {
      onChange(value)
    }, 0)
  }

  return <SearchBar value={value} onChange={handleChange} />
}
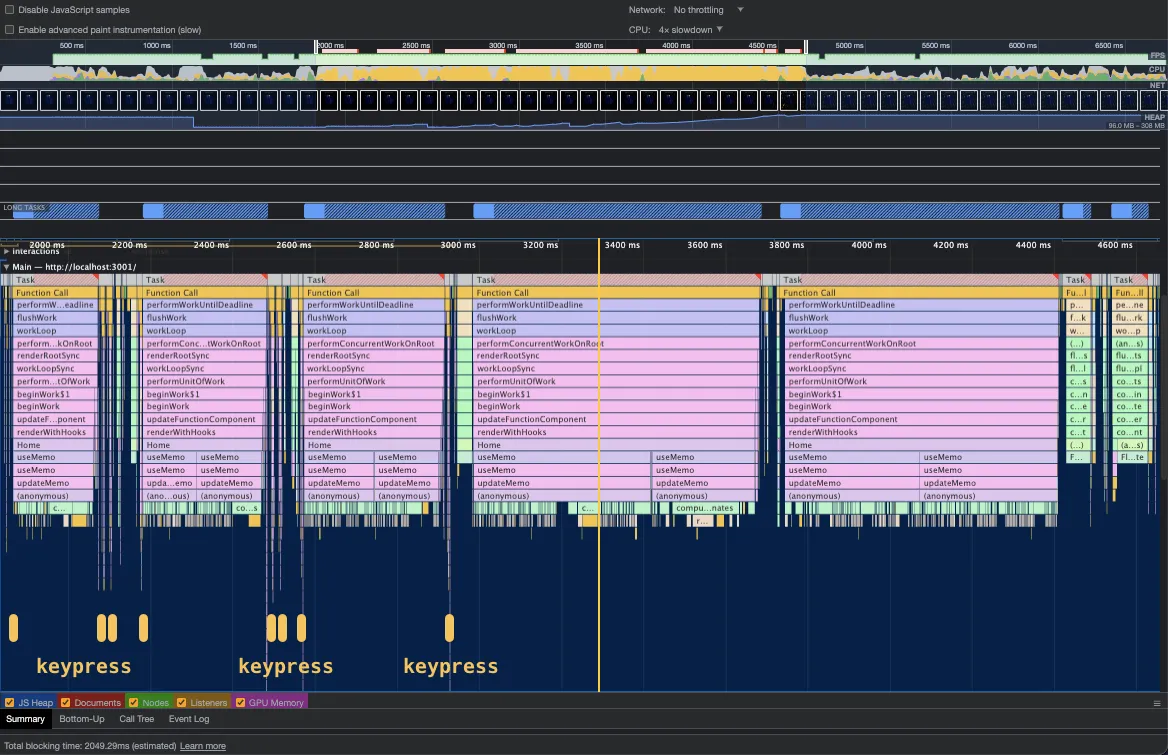
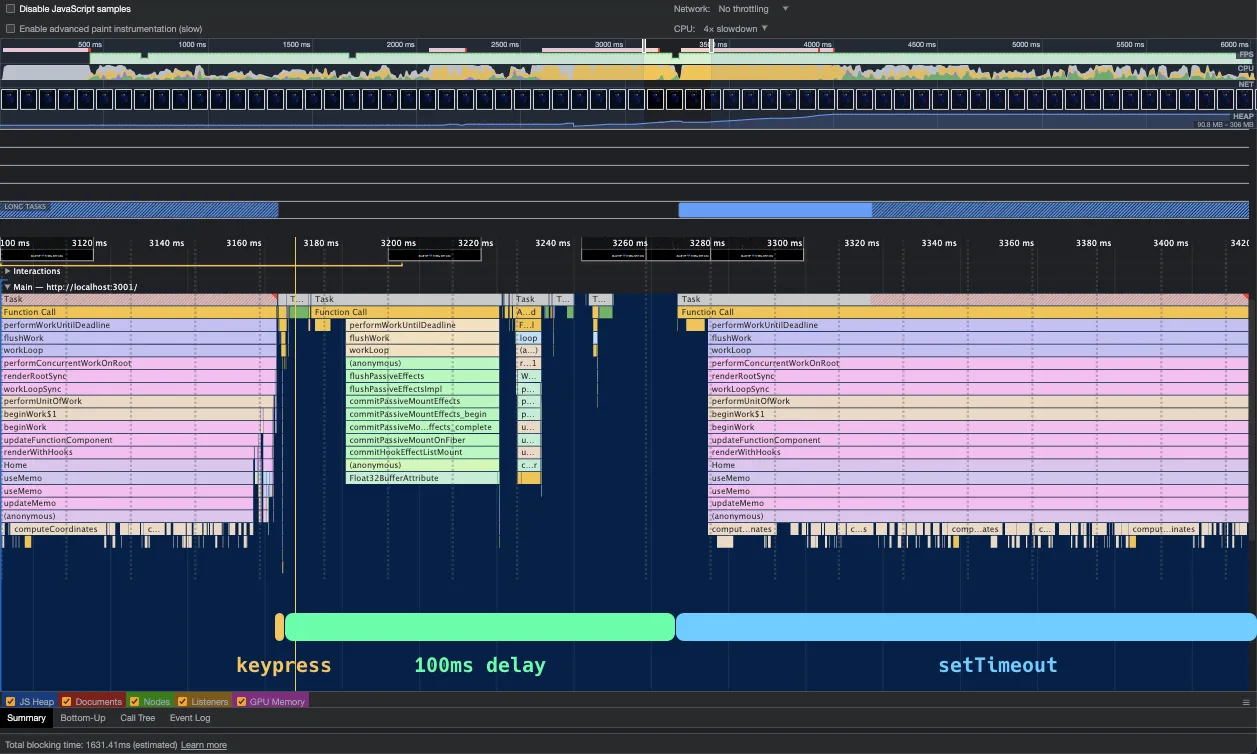
Now even with the 4x slowdown, the SearchBar looks more responsive. We also observed that the stars are getting rendered while we were typing.
If you take a look at the performance profile, you can see that we were able to separate the keypress events from the expensive tasks.
However, we noticed that the Scene was rendered twice after the last keypress event. That's because the renderings were still scheduled with outdated state when the setTimeouts were fired.
Approach #2: Debouncing
We can actually cancel the rendering schedule by implementing debouncing.
function FastSearchBar({ defaultValue, onChange }: FastSearchBarProps) {
  const [value, setValue] = useState(defaultValue)
  const timeout = useRef<NodeJS.Timeout>()

  const handleChange = (value: string) => {
    // cancel the schedule if `value` changed within 100ms.
    clearTimeout(timeout.current)

    setValue(value)

    // schedule a new update if input value hasn't changed for 100ms.
    timeout.current = setTimeout(() => {
      onChange(value)
    }, 100)
  }

  return <SearchBar value={value} onChange={handleChange} />
}
The user experience looks better now. The SearchBar stays fairly responsive with 4x slowdown and the redundant update on the Scene after the last keypress event was gone.
However, the shortcoming of debouncing in this case is that the Scene update will always be delayed by 100ms. With faster CPU, the delay is most likely redundant and it makes the page feel slow.
React 18's Concurrent Rendering: startTransition
The page feel more responsive with either adding setTimeout or debouncing, but they introduces different problems:
- setTimeout: results in additional UI updates with outdated states
- debouncing: results in artificial delay in UI updates
Let's take a look at how React 18 solves the problems with concurrent rendering:
import { startTransition } from 'react'

type FastSearchBarProps = {
  defaultValue: string
  onChange: (value: string) => void
}

function FastSearchBar({ defaultValue, onChange }: FastSearchBarProps) {
  const [value, setValue] = useState(defaultValue)

  const handleChange = (value: string) => {
    setValue(value)
    onChange(value)
  }

  return <SearchBar value={value} onChange={handleChange} />
}

const Home: NextPage = () => {
  const [username, setUsername] = useState<string>('')

  const vertices = useMemo(
    () => computeCoordinates(username.length),
    [username]
  )

  const handleChange = (username: string) => {
    // defer username update in a less urgent UI transition
    startTransition(() => {
      setUsername(username)
    })
  }

  return (
    <Container>
      <FastSearchBar defaultValue={username} onChange={handleChange} />
      <Scene vertices={vertices} />
    </Container>
  )
}
We call setUsername inside of startTransition function. It tells React to defer setUsername to the other urgent updates.
As you can see, we are able to separate the rendering of SearchBar and Scene without any asynchronous functions. If we take a look at the performance profile, we can observe a few things:
- The keypress events are separated from the long rendering function calls.
- The keypress events are grouped. It aligns with the yielding behavior in concurrent rendering.
- There's only one rendering call after the last group of keypress events. It aligns with the skipping old results behavior in concurrent rendering.
The interrupting behavior is not very straight forward to observe. If you know how to analyze it from the performance profile, please feel free to reach out to me on Twitter!
Let's remove the slowdown and see the final result:
As you can see, the SearchBar is always responsive while the Scene updates quickly. The user experience feels so much smoother.
Final Thoughts
In the past, adding debouncing was the go-to solution for rendering large UI updates while keeping pages responsive. Based on this experiment, concurrent rendering makes the UI more responsive without the shortcoming of debouncing. Even for the heavy computation with at least 100,000 3D objects, concurrent rendering still helped the page to be snappy.
Here's the side-by-side comparisons:
UI Comparison with 4x CPU Throttling
Basic implementation without concurrent rendering:
Optimized implementation with concurrent rendering:
UI Comparison with No CPU Throttling
Basic implementation without concurrent rendering:
Optimized implementation with concurrent rendering:
References
- GitHub: Demo repository
- Website: Demo Site
- Website: React v18.0
- GitHub: New feature: startTransition
- GitHub: Real world example: adding startTransition for slow renders
- GitHub: three.js
- GitHub: react-three-fiber
- Website: WebGL Globe Solution
Here you have it! Thanks for reading through🙌 If you find this article useful, please share it to help more people in their engineering journey.
🐦 Feel free to connect with me on twitter!
⏭ Ready for the next article? 👉 I Built A Snappy Static Full-text Search with WebAssembly, Rust, Next.js, and Xor Filters
Happy coding!