

TL;DR
- WebP is a modern image format that provides amazing lossless and lossy compression.
- WebP makes images richer and smaller.
- WebP makes web faster.
- We don't have to convert our images to WebP ourselves. We have tools for that.
- Not all browsers support WebP format so you'll need fallback images.
- Check out source code on GitHub.
What Is Wrong?
As I'm re-making my portfolio, there is something nagging that bothers me.
I have a 128x128 portait photo displayed on the top of my portfolio that is 251.35KB.
It's way too big for its size and takes too long to download and that has a direct impact on my Lighthouse report.
It might not seem like a big deal. Afterall, a lot of people are enjoying high-speed WIFI and modern browsers. But I want my portfolio to be mobile-first. It's important to me that my content can reach to audience that are using cellular data and mobile devices with ease.
next-gen Image Format
There are many ways to tackle image delivery and optimization such as using services like Cloudinary. What I'm looking for is a way to serve self-hosted static assets to reduce complexity of the project and a process that would work with release workflow.
So I want to generate optimized images in next-gen format during build time.
Amond all the format options, WebP is the most widely supported. So let's see how to make it work!
Integrate WebP Image in Project
You can find the source code on GitHub. There are code snippets in this article and you could always reference them in the source code if you're interested.
We can first follow the instruction to generate WebP images with command line.
cwebp -q 75 raw/portrait.png -o optimized/portrait.webp
Let's compare the file size.
- Raw PNG image:
251.35KB - Generated WebP image:
5.3KB
That's a 97.89% reduction right off the bat. Let's have a look at the image quality.

If we zoom in a little, we can actually see the difference between the two compression algorithms.
The WebP format overall quality is very desirable, even with the quality of 75 (0 is the worst, 100 is the best).
Now we can use the generated image in the code.
// components/Intro

<img src="optimized/portrait.webp" alt="Daw-Chih's portrait" />
We can have a look at the download time from Network.
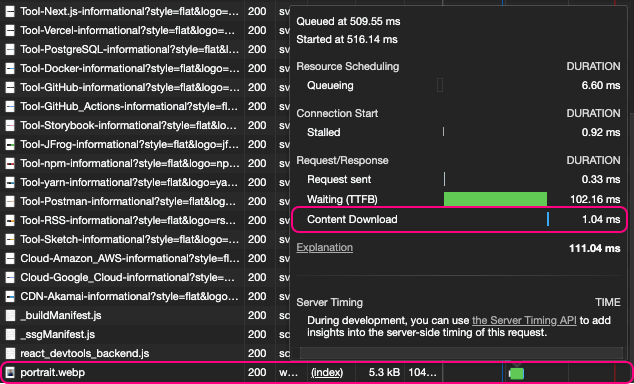
It takes about 1 millisecond to download the image. We just proved how effective WebP can be for our web performance.
Do We Have to Use The Command?
It's not very convenient to convert images with the command.
What we are looking for is to host all the images in /raw directory and output WebP images in /optimized directory.
Luckly I found something cool. imagemin is a npm library that minifies images.
It offers a handy WebP imagemin plugin and all we need to do is to create a JavaScript file,
// lib/webp.js

const imagemin = require('imagemin')
const imageminWebp = require('imagemin-webp')

/**
 * generate webp images inside of destination directory
 */
imagemin(['raw/*.{jpg,png}'], {
  destination: 'optimized',
  plugins: [imageminWebp({ quality: 75 })],
})
and run
node lib/webp.js
to take all the raw images and generate WebP images in /optimized.
Not All Browsers Support WebP Format
So we need fallback images to support wider range of browsers. Let's first optimize our raw images with their original formats.
There are two imagemin plugins we can use:
imagemin-pngquant: for PNG imagesimagemin-jpegtran: for JPEG images
// lib/webp.js

const imageminJpegtran = require('imagemin-jpegtran')
const imageminPngquant = require('imagemin-pngquant')

/**
 * generate optimized fallback images
 */
imagemin(['raw/*.{jpg,png}'], {
  destination: 'optimized',
  plugins: [
    imageminJpegtran(),
    imageminPngquant({
      quality: [0.6, 0.8],
    }),
  ],
})
Now we are ready to add fallback images.
// components/Intro

<picture>
  <source srcSet="optimized/portrait.webp" type="image/webp" />
  <source srcSet="optimized/portrait.png" type="image/png" />
  <img src="optimized/portrait.png" alt="Daw-Chih's portrait" loading="lazy" />
</picture>
At this point, we can really compare all image qualities.
PNG (left) and optimized PNG (right) comparison

PNG (left) and WebP (right) comparison
If you are looking for optimizing SVG files, you can achieve it with imagemin-svgo.
// lib/webp.js

const imageminSvgo = require('imagemin-svgo')

/**
 * generate optimized svg files
 */
imagemin(['public/raw/*.svg'], {
  destination: 'optimized',
  plugins: [imageminSvgo({ removeViewBox: false })],
})
We Are Ready to Integrate with Workflow Automation
In our package.json, add the following scripts.
"scripts": {
  "image": "node lib/webp.js",
  "prepare": "yarn image",
}
The prepare script will execute after installation. This will allow us to build our image assets in the workflows of our choice.
For example, to deploy my portfolio with GitHub Actions to GitHub Pages as a static site, a workflow looks like this.
jobs:
  deploy:
    runs-on: ubuntu-latest
    steps:
      - uses: actions/checkout@v2

      - name: Install dependencies 🐥
        run: yarn install

      - name: Export static assets 📦
        run: yarn build && yarn export

      - name: Deploy to GitHub Pages 🚀
        uses: JamesIves/github-pages-deploy-action@3.6.2
        with:
          GITHUB_TOKEN: ${{ secrets.GITHUB_TOKEN }}
          BRANCH: gh-pages
          FOLDER: out # contains all static assets
In the "Install dependencies" step, the job installs the dependencies, and then generate the optimized images.
The images will be deployed alongside with the other assets in /out directory.
To Sum up
WebP is designed for web. The image quality and size is very desirable especially for mobile users. With the right tooling, generating WebP image can work seemlessly with automation. As long as we make sure that the fallback images are in place, our audience can benefit tremendously from the boost of speed and better enjoy our content.
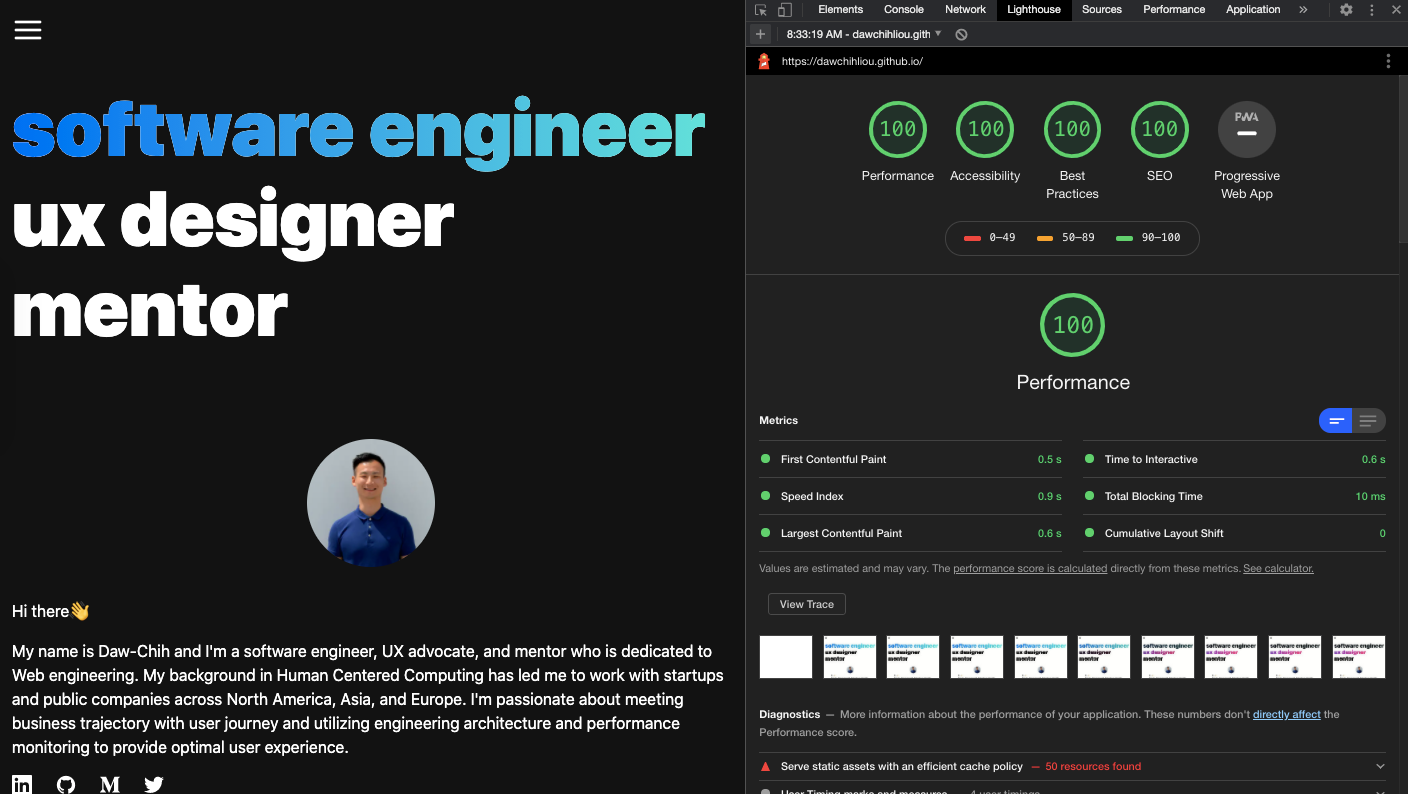
Lighthouse report with optimized WebP images
Here you have it! Thanks for reading through.
I hope I made it as straight forward as possible to grasp. If you have thoughts or there’s something not clear to you, feel free to drop a comment below, or connect with me on twitter!
If you're wondering how to test Redux Observable, I wrote an ariticle "Writing Better Marble Tests for Redux Observable and TypeScript" just for you. It's a comprehensive guide to walk you through the thought process.
If you’re a fan of functional programming, check out this article that I wrote about Transducers. It’s a step by step reasoning on writing a transducer and it touches on key ideas about functional programming.
Happy coding!